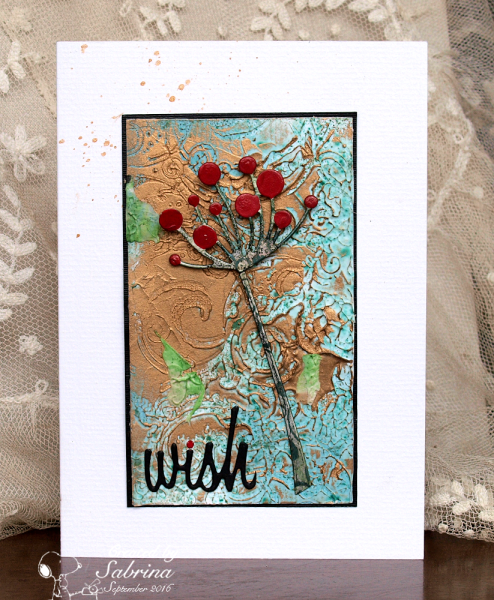
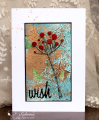
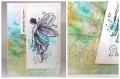
For Judy's great fun TLC today my mind went instantly to the Texture Pressing tutorial. So before work I pulled out a piece of scrap card spattered with something green and spread acrylic modelling paste all over it in a thin coat. Instead of inking the stamp as per tutorial, I just pressed it in neat, as I knew I would be rubbing in some metallic finish after work. It wasn't till I got home from work that I saw that the moisture in the texture paste had transformed a very ugly spattered background into a beautiful sea-green...
Before work I also cut the die, and added high-gloss acrylic paints to the flower head.
Home from work, I buffed some antique gold into the textured panel. I had to try several colours to get the Chloe stem to stand out - I ended up with black but along the way I tried mowed lawn, and it stained some of the texture paste on my mat so nicely that I peeled it off and stuck it on to the main piece.
I added a TH sentiment cut down from wishes to wish, and for the dot on the "i" used the same red paint.
It's matted on black, and before adding it to the card base I spattered copper Twinkling H2Os in the top corner.
I wish this wasn't housework day AND an unexpected dinner guest or I would be trying the embossed hot glue technique again, and faux patina and...and... a very inspiring challenge, Judy.
Date: Monday, September 12, 2016 GMT Views: 2151
Favorited:8
Registered: July 9, 2008 Location: Stars Fell on Alabama Posts: 74834
Mon, Sep 12, 2016 @ 7:01 AM
What a great technique, Sabrina. You really worked those colors into something very special. I love the red Chloe as it stands out in a very striking way.
Too bad about the housework. So many techniques we want to do and not enough time. I want to try that hot glue technique....one I've never done.
------------------------------ My Blog---My Gallery---My PinterestI'm a Punchkateer! (Prez) FOREVERDirty Dozen Alumni2014 CAS Spring DT--- Inspiration Challenge Co- Hostess 12/02/17-12/28/19 Watercolor Wednesday Design Team Hebrews 13:2Brenda
Registered: April 2, 2007 Location: Sunny Central FL! Posts: 4432
Mon, Sep 12, 2016 @ 7:12 AM
Ahhh, Sabrina!, your card is stunning (but that's no surprise!). I love how the texture paste transformed a "not-so-pretty" backgorund into something beautiful.
------------------------------ ~Robin~My little corner of the internet: Robin's RamblingsMy passion - rescuing senior dogs! The Mr Mo Project
Registered: April 14, 2009 Location: San Antonio, TX Posts: 2721
Mon, Sep 12, 2016 @ 8:50 AM
Oooh, this is gorgeous!!! The colors are beautiful!!
------------------------------ From Norway to USA to the world, Hilde
You must be the change you wish to see in the world -Gandhi
Host an exchange student!
Registered: February 23, 2016 Location: El Paso, TX Posts: 22902
Mon, Sep 12, 2016 @ 10:03 AM
Wow - you achieved some awesome textures with that technique. Love that you pulled out things I hadn't thought to open in years like Rub n Buff. That tiny red dot on you wish is the perfect compliment to youir glorious flower.
------------------------------ Linda aka Bubbles
I'm not a Hoarder . . . I'm the Curator of an extensive collection of embellishments!!
Proud Fan Club Member Guest Designer Color Challenge July 2017 Favorites Notification Team
Registered: March 11, 2013 Location: Ingleside, IL Posts: 2449
Mon, Sep 12, 2016 @ 11:22 AM
WOW!! Your description of your techniques is how we all learn and eventually take the leap into your world. I love how you use "happy accident" elements to become a part of your finished pieces. This should be hanging in a gallery.
Registered: August 21, 2007 Location: Wayland MA Posts: 105182
Mon, Sep 12, 2016 @ 11:44 AM
This is amazing, Sabrina!! Pressing into the paste gave the panel fabulous!! texture. The colors are stunning as well! YOWZA!
------------------------------ Anne HarmonFS154, QFTD58, PROUD FAN CLUB MEMBER (photo of our Great Granddaughter Elise, just 6 months old) and me, even older.